It's been a while since I posted. I spent most of my fall developing a hiking app for iOS called Hikers Assistant. You can now find it on the iTunes app store. I didn't want to talk about it before I was able to get it posted on the app store. If you want to take a look at it, go to the iTunes app store and search for Hikers Assistant. You can also see my web site's description at www.sgb-services.com.
But since this is a Google hosted blog, I won't do any advertisement here for it.
I would like to spend a few moments though describing the process of developing, testing, and getting an app accepted for use on Apple mobile devices.
Before I left the Air Force, I had worked on rolling out Apple iPhones to replace the Blackberries we were using previously. As part of that effort, I developed a mobile training app for new AF users. I was traditionally a Windows guy, and before that I had never used an Apple device. But I bought a Mac Mini, paid for an Apple Developer's account ($99/yr), downloaded Apple's development environment, Xcode, and began coding. I had experience in C, C++ and FORTRAN, but had to learn Objective C for iOS apps. I helped run the AF enterprise app store for a while, so I also learned about the Apple Developer Enterprise accounts.
I also learned about mobile security, and the more I learned, the more I liked the Apple iOS approach over the security on my Android devices. I've now converted entirely to Apple; though I may try to expand my development capabilities to also support Android.
But back to developing my app. I wasn't very satisfied with the guides and apps I had available to me on the AT this last spring. I wanted an app that could do most of my on-trail tasks with minimum battery drain. And I wanted it to be efficient to keep my use of electronics to a minimum on the trail. So I put together a general view of what I wanted the app to do for me. I've still got a list of things to add to the app, that were just lower priority.
I had to learn an awful lot. Nearly everything I wanted to do was something I didn't know how to do. Google is great! If you search a few key words and add 'xcode' to the end, you almost always get assistance from a forum called stackoverflow.com. That site is fantastic. If you add the word 'tutorial' to your search, look for a site called www.raywenderlich.com. Their tutorials are consistently high quality. I would decide on a feature I wanted to add, search online to learn how to do it, use the Xcode documentation features, test the feature with my device plugged in, and then take it to the trail and test it. Then I would add another feature with the whole process repeated.
One thing I don't like is using the iOS device simulators Apple has added to their Xcode environment. They are great simulators, they just don't give the look and feel of a real device. It's easier and quicker to keep an iPhone and an iPad plugged into my Mac Mini and test every code change on a real device.
Testing a hiking app in the field is a real effort. First, I like hiking a lot. And I don't want to stop and play around with an iPhone if I don't have to. So I pretty much had to force myself to test my code in the field once I got there. The app is built around GPS for on-trail use, so to test out the tracking capability, I really had to hike with my code. And when it didn't work right, I had to debug at home, make changes, then take it out to the trail again. It's not a timely turn-around for debugging code. Luckily, coding has developed from the early years of FORTRAN. Xcode will not let you do a formatting error. Any error is almost always due to faulty logic, or sometimes failing to initialize a variable properly.
Another complexity to the code was that I wanted the app to run on both iPhones and iPads. And I didn't want the iPad version to look like a phone window. I wanted to be able to plan routes and waypoints on a large iPad, but take a small iPhone on the trail. Apple really pushes their Auto Layout capability. But it is complicated and never seems to work up to my expectations (probably due to deficiencies in my own understanding and skills). So I've developed my own approach to laying out subviews for each screen in the app. I think it takes a little more time to do the layout, but I know what's going to happen on screen on different devices.
Related to that point is trying to make the user interface look professional enough for a commercially available app. I had to continually tweak the interface, and the in-app navigation and layout, to make the app look good and to support a simple and effective user experience.
The app is more complicated than most mapping or hiking related apps I've seen. So the complexity drove a kind of uniformity on the various screens (different features) that hopefully let the user guess what each button does, even if they haven't used that specific screen/feature before.
I also found out that on trail, it is hard to see an iPhone's screen. Its worse for me than for some folks, because I cannot see up close well without reading glasses. And I hate to get out my reading glasses on the trail. I use rotating 'pickers' to navigate through the app, but I couldn't read the selected line in the picker. And Apple restricts the size of the pickers on the screen, so I couldn't make it big enough to see easily. I decided to add colors to picker entries that I would be using on trail. Most on trail features don't require typing, and when I do have to type a new 'quick waypoint's' name, I can use an abbreviation, and then expand it at a trail stop or at the end of the day.
So I got most of my features in, tested, and working properly. The next issue that arose was when enough features were enough to post the app on the store. There's always more you want to add. And you keep finding minor bugs even as you start preparing the app for posting--they never seem to all be gone!
So I finally bit the bullet, and put the app metadata up on iTunes Connect, Apple's site for submitting apps for its store. I had to create a seemingly unending set of screen shots to post, some for nearly every class of mobile devices. And crafting the app Description was kind of like writing a self-assessment for an annual review in the Air Force. You try to make it look good without going overboard.
Once you hit the Submit for Review button, you start wondering what they will find that you missed. My app was awaiting review for nearly 8 days. Then I got an email that said it was in review. A little later, I got an email that it was rejected. I had failed to add a line to the app Description that warned potential buyers that use of GPS in the background (while logging a track) would use a lot of battery. I do have in-app warnings in bright red, so folks won't use GPS features that drain the battery. I should say most use of GPS in the app is just getting your instantaneous position, then the GPS function is disabled.
So I added the line to the app Description and hit the Submit for Review button again. About seven days later, it was again reviewed. This time it was accepted, and the app was posted on the store within 24 hours!
Now you wonder if anyone will notice the app, let alone buy it. Part of my prep for submitting the app was preparing a web site and setting up a limited liability company to protect my personal finances. What I'm probably not very effective at is marketing. That's something you should consider if you want to develop your own app.
If any of you do try out the app, please let me know what you think. I'm always open to suggestions. And would also appreciate reviews on the app store.
Monday, December 21, 2015
Sunday, July 26, 2015
Rocky Mountains National Park
Rocky Mountains National Park
Thursday, July 23, 2015
We had one day to see the park. The plan was to get up early, drive for two hours to the park, hike a couple of short hikes, and drive along the road through the park. We would get back about 8:30 pm. The plan went pretty much as expected.
We went straight up I-25 through Denver and got through about 6:30 to 6:45 without getting stopped in a traffic jam. After stopping for breakfast, we got to the Beaver Meadows Visitor Center about 8:40 am. I asked the ranger at the desk about light hikes due to my wife's problems with altitude. He suggested a hike around Sprague Lake. He said the trails around Bear Lake and the other lakes nearby were great, but that the parking lot there was already full, and we would have to park and ride the shuttle bus to get there. There were lots of cars, and nearly every parking lot on the east side of the park was full, all the way up to and including the Alpine Visitor Center parking lot.
Anyway, here's a section map the ranger gave us for the Sprague Lake hike. Apparently they have these nice little section maps, available upon request, for their hiking trails.
 But since we only had one day to see the park, we planned for most of our time to be driving around the Trail Ridge Road. Here's the overall park map.
 Here's a shot from Sprague Lake.
 Then we drove on down to Bear Lake to see the crowded, car-packed trail head, and of course the scenes along the way. Next we drove up to the Endovalley and had some early lunch snacks. There is a one-way dirt road from that point up to the Alpine Visitor Center, the Old Fall River Road. Lots of cars were taking it, and many seemed to be 2-wheel drive. We were driving our 2-wheel drive pickup, and decided to stay on the paved Trail Ridge Road. Here are a bunch of shots we took mostly from stops along the way.


 At one point, cars were stopped and moving at a slow crawl. Turned out a huge elk was sunning himself 50' off the road. Two other smaller elk were up the hills.

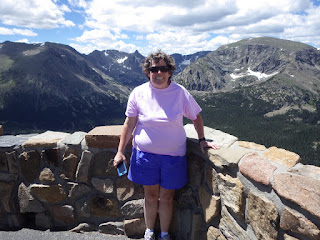
 The shot just above was using only my 4x optical zoom on the point-and-shoot Ricoh WG-4. We kept driving and here are some more shots, including one of my wife from a great overlook.


 The western section of the road seems to mostly pass through a valley and meadows following the Colorado River. The river looks more like a stream here. We just missed shots of a couple of moose, and drove out of the park a little disappointed. We stopped at the Kawuneeche Visitor Center to get a gift for my nephew, then decided to go back into the park and look for more moose. In fact, we stopped to see the buildings at the Holzwarth Historic Site that in the early 1900's was a lodge for trout fishermen on the Colorado River.

 We did in fact see the moose! Here are some shots along with one of the Colorado.


 After we finally left the park, we stopped at the Grand Lake Lodge, a national historical site, for a late lunch. The food was good. We also drove through the small tourist down of Grand Lake Village. Then we headed back for the 2 1/2 hour drive to my sister's house. Along the way, we saw what looked like a blown out volcano, so I couldn't resist the shot.
 I liked RMNP, but think Yellowstone is better. If you have time for this park, try to plan some time for hiking. Have a good day!
Thursday, July 23, 2015
We had one day to see the park. The plan was to get up early, drive for two hours to the park, hike a couple of short hikes, and drive along the road through the park. We would get back about 8:30 pm. The plan went pretty much as expected.
We went straight up I-25 through Denver and got through about 6:30 to 6:45 without getting stopped in a traffic jam. After stopping for breakfast, we got to the Beaver Meadows Visitor Center about 8:40 am. I asked the ranger at the desk about light hikes due to my wife's problems with altitude. He suggested a hike around Sprague Lake. He said the trails around Bear Lake and the other lakes nearby were great, but that the parking lot there was already full, and we would have to park and ride the shuttle bus to get there. There were lots of cars, and nearly every parking lot on the east side of the park was full, all the way up to and including the Alpine Visitor Center parking lot.
Anyway, here's a section map the ranger gave us for the Sprague Lake hike. Apparently they have these nice little section maps, available upon request, for their hiking trails.


Denver Zoo
Denver Zoo
Wednesday, July 22, 2015
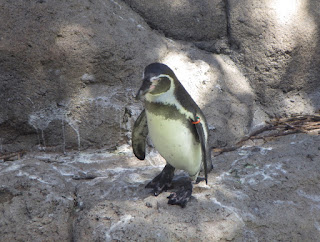
Two zoos in one week. A record for me! I probably preferred the Denver Zoo over the Cheyenne Mountain Zoo. Lots of great animal photos today. I think the animals were just better for viewing and photos and there were more of them. The cost was about the same. No sky lift today, but lots of sun and heat. I liked that there were more cafes, restrooms, and fountains. But snack/lunch costs were about the same. Not a lot else to say about a zoo; we stayed from about 10:15 am to 3:15 pm and I think we saw everything. Here are the photos. I'm posting lots more than usual...
First here's the map of the zoo. It's right down town.
 Now the animals...


 The burro and the ostrich merit a few words. The ostrich sat down soon after we arrived. The burro was wandering around the area and every so often would closely approach the ostrich. At that point the ostrich would snap/squawk at the burro, who would back off. I don't know if the burro wanted to irritate the ostrich, whether the ostrich was sitting on its spot, or whether the burro just wanted to play. It reminded me of our border collie sauntering towards a feeding deer in our yard. He walks slowly and carefully towards the deer until the deer moves away from its feeding location. Intentional activity both by the border collie and the burro.


 That's about it. I'm not real patient at animal enclosures. The fact that I got so many good shots (relative to my previous zoo visits) suggests that the Denver Zoo does a good job of showing off the animals. I would highly recommend this zoo.
Have a good day!
Wednesday, July 22, 2015
Two zoos in one week. A record for me! I probably preferred the Denver Zoo over the Cheyenne Mountain Zoo. Lots of great animal photos today. I think the animals were just better for viewing and photos and there were more of them. The cost was about the same. No sky lift today, but lots of sun and heat. I liked that there were more cafes, restrooms, and fountains. But snack/lunch costs were about the same. Not a lot else to say about a zoo; we stayed from about 10:15 am to 3:15 pm and I think we saw everything. Here are the photos. I'm posting lots more than usual...
First here's the map of the zoo. It's right down town.


Have a good day!
Subscribe to:
Comments (Atom)